Herbed Garlic High-Protein Bagels
Highlighted under: Healthy Meals Quick
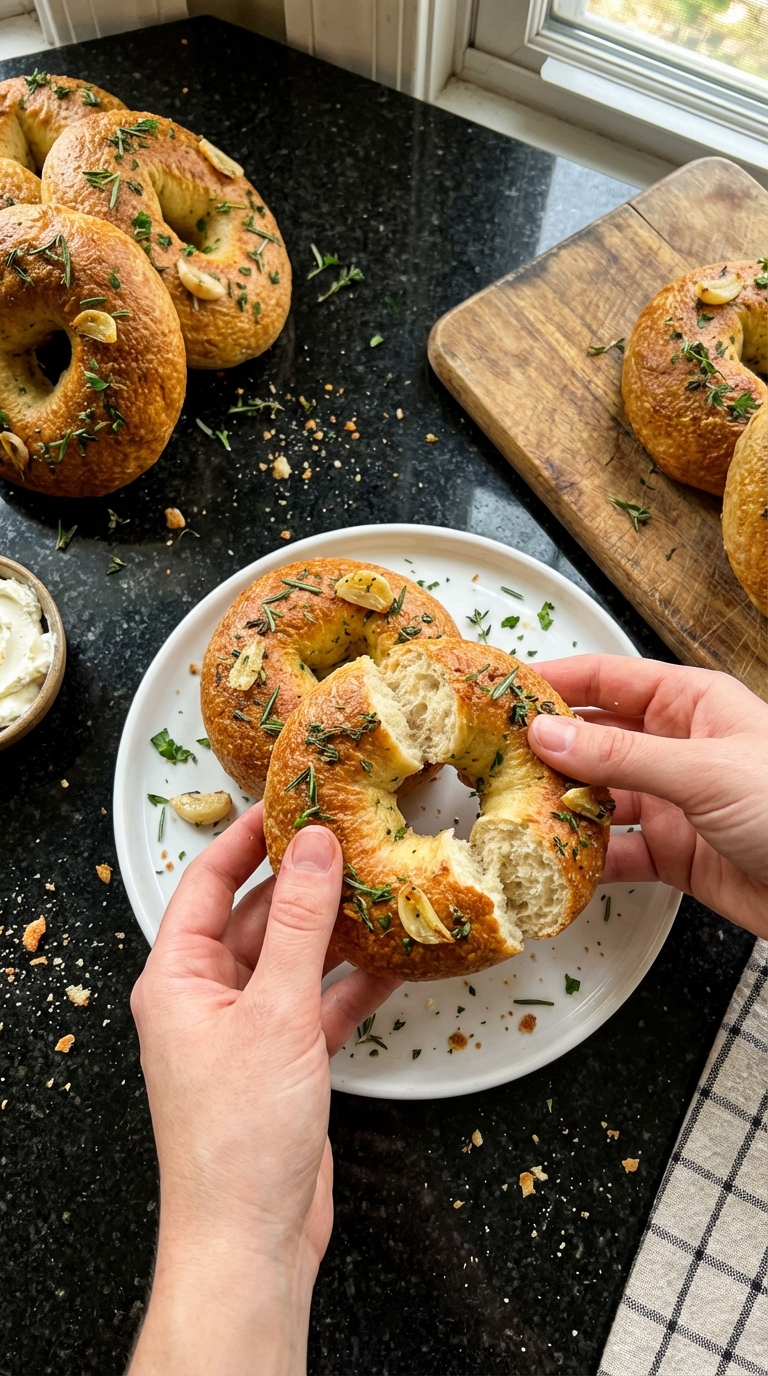
I love starting my day with a delicious bagel, and these Herbed Garlic High-Protein Bagels have become a favorite in my household. The combination of fresh herbs and savory garlic not only elevates the flavor but also enhances the nutritional content, making them perfect for breakfast or a snack. We enjoy them smeared with cream cheese or topped with avocado for a satisfying meal. Plus, they’re easy to make and packed with protein, which keeps us feeling full longer. I can't wait for you to try them!
Every time I bake these Herbed Garlic High-Protein Bagels, I’m reminded of the time I spent in a local bakery, watching how they masterfully crafted each bagel. It inspired me to develop a healthier version that focuses on protein without sacrificing flavor. Using a mix of Greek yogurt and protein-rich flour, I was able to create a dough that is both versatile and satisfying. The fresh herbs really shine through, making each bite delightful.
One of my favorite tips for achieving a perfect bagel texture is boiling them briefly before baking. This step not only gives them that characteristic chewiness but also enhances the browning effect in the oven, resulting in a beautiful golden color. I promise these bagels will have everyone coming back for more!
Why You'll Love These Bagels
- Packed with protein to keep you energized throughout the day
- Infused with aromatic herbs and garlic for a burst of flavor
- Easy to prepare and perfect for meal prep or family brunches
The Role of High-Protein Flour
Using high-protein flour is key to achieving the perfect bagel texture. High-protein flour contains more gluten-forming proteins than all-purpose flour, resulting in a deliciously chewy bagel. This chewiness holds up well against the added toppings, like cream cheese or avocado, giving you satisfaction in every bite. If you can’t find high-protein flour, you can substitute it with a blend of all-purpose flour and vital wheat gluten, but be sure to still maintain the correct proportions to keep the structure intact.
Once you combine the flour with the Greek yogurt, you'll notice how the moisture from the yogurt activates the flour, helping develop that essential gluten. Kneading the dough well is important because it ensures that the proteins develop fully, giving your bagels that coveted chewy texture. When kneading, aim for about 5-7 minutes until the dough is smooth and elastic. If the dough feels too dry, consider adding a teaspoon of water gradually until you reach a workable consistency.
Perfecting the Boiling Technique
Boiling the bagels is a crucial step that sets them apart from other baked goods. This process not only helps develop a shiny exterior but also contributes to their dense texture. When boiling, aim for a rolling boil and gently lower the bagels to avoid splashing hot water. Cooking for 1-2 minutes per side is generally sufficient; overcooking can lead to a tough bagel, while undercooking can result in a doughy center. Keep an eye on them, and when they float to the surface, that’s a good sign they’re done!
If you want to experiment with flavors, consider adding a tablespoon of honey or malt extract to the boiling water. This can give your bagels a touch of sweetness and a deeper flavor profile. Additionally, if you prefer a more rustic look, you can skip the egg wash for a slightly less glossy finish. Just remember, the egg wash helps to enhance browning and allows seeds or toppings to adhere better, so it’s a great option if you're looking for a bit more character in your bagels.
Serving and Storage Tips
Once your bagels are cooled, they can be sliced and toasted for added texture, or served fresh out of the oven with your favorite spread. For a simple yet tasty combination, I recommend a smear of cream cheese topped with sliced cucumbers and fresh dill. If you prefer something heartier, avocado smashed with lime juice and a sprinkle of salt can elevate your breakfast or snack time. These bagels also pair wonderfully with smoked salmon for a twist on classic bagel toppings.
If you're batch cooking, these bagels can be stored in an airtight container at room temperature for about two days. For longer storage, freeze the bagels after they've completely cooled. Wrap them tightly in plastic wrap and place them in a freezer-safe bag, and they can last for up to three months. When you’re ready to eat, just pop them in the toaster or reheat in an oven preheated to 350°F (175°C) for about 5-10 minutes to restore their chewy goodness.
Ingredients
Gather these fresh ingredients to make your Herbed Garlic High-Protein Bagels:
Bagel Ingredients
- 2 cups high-protein flour
- 1 cup Greek yogurt
- 2 teaspoons baking powder
- 1 teaspoon salt
- 2 cloves garlic, minced
- 1 tablespoon dried oregano
- 1 tablespoon fresh chives, chopped
- 1 tablespoon fresh parsley, chopped
- 1 egg (for egg wash)
Make sure to measure everything accurately for the best results.
Instructions
Follow these steps to create your delicious bagels:
Preheat Oven
Preheat your oven to 375°F (190°C) and line a baking sheet with parchment paper.
Mix Ingredients
In a large bowl, combine the high-protein flour, baking powder, salt, minced garlic, oregano, chives, and parsley. Mix well.
Form Dough
Add the Greek yogurt to the dry ingredients and mix until a dough forms. Knead the dough on a floured surface until it's smooth.
Shape Bagels
Divide the dough into eight equal pieces. Roll each piece into a ball and then poke a hole in the center to shape it into a bagel.
Boil Bagels
Bring a pot of water to a boil and gently add the bagels, cooking them for about 1-2 minutes per side. Remove and let them drain on a paper towel.
Egg Wash and Bake
Place the boiled bagels on the prepared baking sheet. Brush the tops with beaten egg and bake in the preheated oven for about 20-25 minutes or until golden brown.
Cool and Serve
Allow the bagels to cool on a wire rack before slicing. Enjoy with your favorite toppings!
These bagels are best enjoyed fresh but can be stored in an airtight container for a few days.
Pro Tips
- For added flavor, consider experimenting with different herbs or even cheese in the dough. You can also freeze the bagels for longer storage, simply thaw and toast when ready to eat.
Creative Variations
Feel free to play around with the herb mix in this recipe! While oregano, chives, and parsley work beautifully, you can also incorporate basil, thyme, or even rosemary for different flavor profiles. Think about seasonal herbs as well—chopped up fresh dill or cilantro can create fun, unexpected twists. If you're a garlic lover, try adding roasted garlic instead of fresh for a sweeter, milder taste.
If you’re looking for a challenge or a unique twist, consider turning these bagels into a filled version. After shaping the bagels, flatten the dough, place a dollop of your favorite cream cheese or a cheesy filling in the center, then fold the edges over and reshape into a bagel. Be sure to seal them well so the filling doesn't escape during boiling.
Troubleshooting Common Issues
If your bagels turn out too dense, this might be a sign of over-kneading the dough, which can lead to excessive gluten development. Remember, you want to knead just until smooth. Alternatively, if the dough is too loose or doesn't hold shape well, it may be due to too much yogurt or not enough flour. Adjusting your measurements can help achieve that perfect dough consistency.
Another common issue can be burned bottoms when baking. This often occurs due to uneven oven temperatures or incorrect placement of the baking sheet in the oven. To ensure even baking, place your bagels in the center of the oven and check their progress halfway through. If you notice they're browning too quickly on the bottom, consider placing the baking sheet on a higher rack or using a baking stone to regulate heat more effectively.
Questions About Recipes
→ Can I use regular flour instead of high-protein flour?
Yes, but the texture and protein content may vary; high-protein flour helps create a chewier bagel.
→ How do I store these bagels?
Store them in an airtight container at room temperature for up to 3 days, or freeze for up to 3 months.
→ Can I add toppings to my bagels?
Absolutely! Consider topping with sesame seeds or everything bagel seasoning before baking.
→ Is the boiling step necessary?
Yes, boiling the bagels before baking is what gives them that characteristic chewy texture.
Herbed Garlic High-Protein Bagels
Created by: The Pantrytrail Team
Recipe Type: Healthy Meals Quick
Skill Level: Intermediate
Final Quantity: 8 bagels
What You'll Need
Bagel Ingredients
- 2 cups high-protein flour
- 1 cup Greek yogurt
- 2 teaspoons baking powder
- 1 teaspoon salt
- 2 cloves garlic, minced
- 1 tablespoon dried oregano
- 1 tablespoon fresh chives, chopped
- 1 tablespoon fresh parsley, chopped
- 1 egg (for egg wash)
How-To Steps
Preheat your oven to 375°F (190°C) and line a baking sheet with parchment paper.
In a large bowl, combine the high-protein flour, baking powder, salt, minced garlic, oregano, chives, and parsley. Mix well.
Add the Greek yogurt to the dry ingredients and mix until a dough forms. Knead the dough on a floured surface until it's smooth.
Divide the dough into eight equal pieces. Roll each piece into a ball and then poke a hole in the center to shape it into a bagel.
Bring a pot of water to a boil and gently add the bagels, cooking them for about 1-2 minutes per side. Remove and let them drain on a paper towel.
Place the boiled bagels on the prepared baking sheet. Brush the tops with beaten egg and bake in the preheated oven for about 20-25 minutes or until golden brown.
Allow the bagels to cool on a wire rack before slicing. Enjoy with your favorite toppings!
Extra Tips
- For added flavor, consider experimenting with different herbs or even cheese in the dough. You can also freeze the bagels for longer storage, simply thaw and toast when ready to eat.
Nutritional Breakdown (Per Serving)
- Calories: 270 kcal
- Total Fat: 6g
- Saturated Fat: 1g
- Cholesterol: 30mg
- Sodium: 450mg
- Total Carbohydrates: 44g
- Dietary Fiber: 2g
- Sugars: 1g
- Protein: 12g