Passionate Heart-Shaped Charcuterie
Highlighted under: Seasonal Recipes Festive
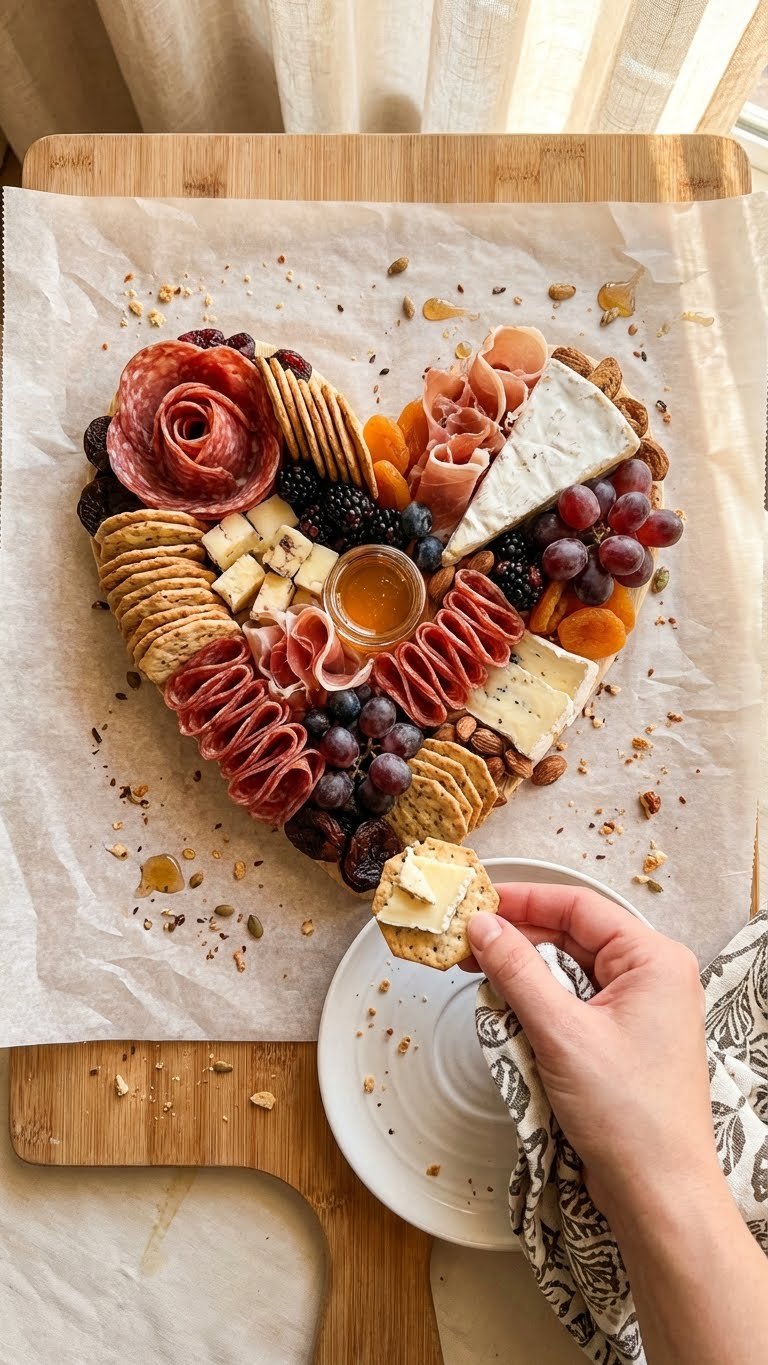
I love crafting the perfect charcuterie board, and this Passionate Heart-Shaped Charcuterie is my recent favorite. The way it combines all the flavors and colors makes it perfect for any romantic occasion or just a fun gathering with friends. I couldn’t resist using heart-shaped elements to create something visually striking. It's more than just cheese and meats; the addition of fruits and nuts elevates the whole experience. Trust me, everyone will be asking for your secrets!
Creating this charcuterie board was a delightful challenge! I wanted to embody the spirit of romance and creativity in a single platter. Using a variety of cheeses, cured meats, and fresh fruits, I discovered that the arrangement is just as important as what you use. For a stunning visual impact, I used a heart-shaped serving board that not only enhances presentation but also brings a festive, loving vibe to any occasion.
One tip I swear by is to select a mix of textures and flavors: creamy brie, sharp cheddar, and savory prosciutto all come together beautifully. Incorporating fresh herbs as garnish not only adds flavor but elevates the entire aesthetic. Don’t forget to include a few nuts and chocolates to balance the savory with sweetness!
Why You'll Love This Recipe
- Creative presentation that’s perfect for romantic occasions
- A delightful variety of flavors and textures in every bite
- Easy to assemble and customize for any taste preference
Crafting Your Heart-Shaped Presentation
Creating a heart-shaped charcuterie board isn’t just about arranging food; it’s a visual art that elevates the overall experience. Start by choosing a large, solid cutting board or a platter that suits the generous portions of cheese and meats. An effective method to shape your presentation is to divide the board into two halves subtly, placing cheese in the upper part and meats on the lower part. This allows the heart shape to form naturally as you fill in the gaps with snacks and fruits.
When it comes to cutting cheeses, consider using various molds to create different shapes that complement the heart theme. A heart-shaped cookie cutter can be useful for soft cheeses like brie, adding an additional dimension to your presentation. For the harder cheeses such as cheddar and gouda, cubing them into uniform bites helps maintain consistency and keeps the look elegant and meticulous.
Choosing the Right Ingredients
The interplay of flavors and textures is what makes a charcuterie board memorable. Each component should enhance the others; for example, the creaminess of brie works beautifully against the salty notes of prosciutto. When selecting fruits, aim for a mix of colors and flavors—tart grapes contrast nicely with sweet strawberries and figs, while pitted olives add a briny taste that rounds out the experience. If you can’t find figs, consider using fresh apples or pears for a different texture but similar visual appeal.
Nuts play a crucial role as well, providing a satisfying crunch. If you’re looking to make the board more inclusive, opt for nut-free alternatives such as pumpkin seeds or chickpea snacks, especially if you have guests with nut allergies. Similarly, consider using vegan cheeses or plant-based meat alternatives as substitutions for creating inclusive offerings without sacrificing flavor.
Ingredients
The ingredients for this charcuterie board can be tailored to suit your taste, but here are my go-to selections:
Charcuterie Ingredients
- 1 cup of assorted cheeses (brie, cheddar, gouda)
- 1 cup of cured meats (salami, prosciutto)
- 1/2 cup of mixed nuts (almonds, walnuts)
- 1 cup of fresh fruits (grapes, strawberries, figs)
- 1/4 cup of olives
- 1/4 cup of dried fruits (apricots, cranberries)
- Crackers or breadsticks
Feel free to swap out any items or add your favorite treats to personalize this board!
Instructions
Putting together this charcuterie board is straightforward and fun. Follow my steps for the best results:
Prepare the Ingredients
Firstly, gather all your ingredients. Slice the cheeses into varying shapes and sizes to create visual interest. Arrange the cured meats in a circular pattern or ribbon them for an elegant look.
Create the Board Layout
Start with the largest items first, usually the cheeses, placing them on the board. Then, fill in with cured meats, nuts, and then fruits, leaving some spaces for crackers.
Add Final Touches
Finally, sprinkle some fresh herbs around for garnish and include your olives and dried fruits in small bowls for added flair. It’s all about how you arrange it!
Remember, the beauty of a charcuterie board is in the presentation, so take your time to make it visually appealing!
Pro Tips
- Mix and match different cheeses and meats based on your preference and dietary restrictions. Experimenting with different fruits can also add a delightful twist!
Storage and Make-Ahead Tips
One of the best aspects of a charcuterie board is its versatility and make-ahead potential. Most of the components can be prepared a day in advance. Slice and arrange the cheeses and cured meats the night before, keeping them covered in the refrigerator. Fruits can be pre-washed and dried; keep them in an airtight container, but avoid slicing them ahead of time to maintain freshness.
Assemble the board just before serving to ensure every element is at its best. If you have leftovers, store items separately; crackers can become soggy when mixed with moist components like fruits or soft cheeses. Place open cheeses in wax paper or plastic wrap to prolong their flavor and maintain texture, minimizing exposure to air.
Serving Suggestions and Variations
Pairing beverages with your charcuterie board enhances the dining experience. Wines, particularly a crisp white or a light red, complement the range of flavors beautifully. If you prefer a non-alcoholic option, consider offering sparkling water with citrus slices; it refreshes the palate between bites. To add a little something extra, a honey drizzle over your cheeses can provide a sweet counterpoint, marrying well with savory notes.
For variations, think of seasonal themes. In the fall, for instance, you could incorporate roasted squash cubes or spiced nuts, while in summer, grilled vegetables and fresh herbs can take center stage. Adjust the variety and styles of cheeses and meats according to seasonal availability; this not only keeps the board exciting but also leverages freshness at its peak.
Questions About Recipes
→ Can I make this charcuterie board ahead of time?
Absolutely! You can prepare the cheese and meat selection a few hours in advance. Just cover it tightly with plastic wrap to retain freshness.
→ What can I use instead of dried fruits?
If you prefer, you can use additional fresh fruits or even chocolate pieces for a sweet touch.
→ How do I choose the right cheese for my board?
Aim for a mix of textures and flavors. Including creamy, hard, and strong cheeses creates a well-rounded experience.
→ Is this board suitable for vegetarians?
Yes! You can easily substitute the cured meats with additional vegetables, cheese, or plant-based options.
Passionate Heart-Shaped Charcuterie
Created by: The Pantrytrail Team
Recipe Type: Seasonal Recipes Festive
Skill Level: Easy
Final Quantity: Serves 4
What You'll Need
Charcuterie Ingredients
- 1 cup of assorted cheeses (brie, cheddar, gouda)
- 1 cup of cured meats (salami, prosciutto)
- 1/2 cup of mixed nuts (almonds, walnuts)
- 1 cup of fresh fruits (grapes, strawberries, figs)
- 1/4 cup of olives
- 1/4 cup of dried fruits (apricots, cranberries)
- Crackers or breadsticks
How-To Steps
Firstly, gather all your ingredients. Slice the cheeses into varying shapes and sizes to create visual interest. Arrange the cured meats in a circular pattern or ribbon them for an elegant look.
Start with the largest items first, usually the cheeses, placing them on the board. Then, fill in with cured meats, nuts, and then fruits, leaving some spaces for crackers.
Finally, sprinkle some fresh herbs around for garnish and include your olives and dried fruits in small bowls for added flair. It’s all about how you arrange it!
Extra Tips
- Mix and match different cheeses and meats based on your preference and dietary restrictions. Experimenting with different fruits can also add a delightful twist!
Nutritional Breakdown (Per Serving)
- Calories: 250 kcal
- Total Fat: 18g
- Saturated Fat: 7g
- Cholesterol: 30mg
- Sodium: 400mg
- Total Carbohydrates: 10g
- Dietary Fiber: 2g
- Sugars: 4g
- Protein: 7g